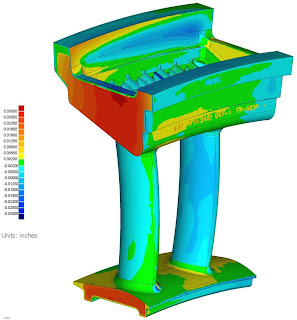
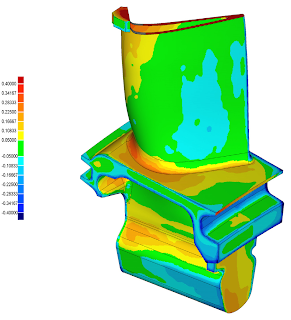
Industrial Gas Turbine Components
More, better, faster is probably the mantra of every manufacturer, especially as it applies to quality inspection.
Level 3 Inspection has found a solution to the more-faster-better inspection dilemma. The company has developed a SmartFAI process that combines White Light Scanning (WLS) with computer-aided-inspection (CAI).
The combination gives Level 3 the ability to perform more comprehensive inspections on parts in a shorter amount of time. The First Article Inspection SmartFAI process involves verifying every feature on the part by comparing it to a customer-supplied part print and 3D CAD model. First-article inspections are done prior to full production release and often while a part is in development.
The Level 3 approach replaces traditional plate inspection or a CMM system with WLS, which can capture and calculate precise 3D coordinates for millions of points in seconds.
CMM captures only a few points in the time that WLS can capture hundreds of thousands, so Level 3 is able to do a more thorough inspection. The results are much more visual and therefore much more easily understood and interpreted.
Turbine airfoil inspection poses some unique challenges, such as analyzing the twist of a newly manufactured blade compared to the CAD model. This is difficult using a CMM system, which depends on the operator to accurately capture the points that will show whether or not the blade is twisted within the allowable tolerance. Often, there is not enough point data to make an accurate comparison.
Level 3 Inspection has the ability to automate twist analysis. Level 3 can align a cross-section of the scanned model to reference data, and automatically generate statistics on the twist of the blade. Constraints can be placed on maximum rotation and twist tolerance.
 Level 3 also provides graphical inspection for turbine blade properties such as mean camber line; maximum thickness; leading-edge and trailing-edge radius; thickness at offsets from the blade ends; wall thickness and chord length.
The new capabilities provided by computer-aided inspection have not come a moment too soon for the increasingly competitive gas turbine parts market. Increasingly, companies are facing the demand for more quality inspection results in less time.
Level 3 Inspection’s customers are moving quickly to statistically based inspections in which the qualification is based not on a single piece, but on a sampling of parts, new part inspection would take much longer to complete without the ability to automate portions of the process.
Level 3 is replacing the CMM-based process with automated trend analysis. Once a part is scanned and a report is saved, Level 3 can automatically generate portions of the capability studies defined by their customer or OEM specifications. Batch processing enables Level 3 to collect data and generate reports on a large number of parts. Statistical analysis tools allow Level 3 to compare parts for pre-defined factors such as repeatability, changes over time, and variations from part to part.
Speed is the key. Speed of inspection is always Level 3 Inspection’s main challenge. Everyone wants the results yesterday and our process is helping us deliver more complete results much quicker.
Contact us today to start getting superior inspection results in shorter time with easier understanding leading to higher confidence.


