Updates & News - Level 3 Inspection

Introducing Dimensions from Level 3 Inspection

Level 3 Inspection Presents:
An advanced software application for Integrated Computer Aided Inspection Processes
For a look at how it’s done, see our animated help section.
DIMENSIONS
Dimensions™ lets users create ballooned drawings faster and easier than ever before. The real power is in the reporting, with the ability to import data from any measurement device and output that data into any report format. Automatically.
Balloons™: Free Application
  • Create ballooned drawings from blueprint PDF files, simply and easily.
    • Import PDF blueprint/drawing
    • Add balloons as overlay
      • Add sequential balloons and sub-balloons, based on any spec/protocol (we have one to recommend)
      • Enter requirements directly into software and automatically tie requirements to balloon, by balloon number.
    • Query user for information to be used throughout reports to be generated.
      • Part number
      • Part name
      • Serial number
  • Export blank forms (MS Excel or any other format)
    • AS9102 Forms 1, 2 & 3
    • GE specific: eCav form
    • PW specific: Risk based AS9102 form 3, 56B, 56C, RMEA and 56C deviation summary
    • NetInspect
    • Any custom report template you may have
  • Export ballooned drawings as PDF files
    • Select balloon color on export
Reports™: Individual or Site Licensed
  • Inputs:
    • Read inspection device or software outputs, directly into Dimensions™, for use in reporting measured data in specific forms
      • Geomagic importer included
      • GOM Inspect importer included
      • Polyworks importer included
      • Custom importers available for any measurement device or software
  • Outputs:
    • Aerospace specific forms:
      • AS9102 Forms 1, 2 & 3
      • GE specific: eCav form
      • PW specific: Risk based AS9102 form 3, 56B, 56C, RMEA and 56C deviation summary
      • NetInspect Import Template
    • Custom forms
      • Custom template creation available
      • Output into any existing report format
    • Automatically create deviation summary
    • Automatically create capability or probability study, using default template or any custom template
    • Ability to create and retain formulas and calculations from imported data to populate calculated measurement data directly from imported data
    • Ability to specify at-risk limit by percentage
    • Export color coded balloon drawing as a PDF file, with colors showing: pass/fail/at-risk

Call 772-444-7534 or email us to learn more!

The PW 6078 Spec Challenge


The PW 6078 Spec

Pratt & Whitney, as many know, is a world leader in the design, manufacture and service of aircraft engines.  With over 13,000 large commercial engines installed and over 6,500 military engines in service today, Pratt’s innovations in power-plant design continue to set the pace for progress in aviation.  They achieved that rank through intense attention to detail, hard work, and dedication to quality and performance.
One of the best and most rigorous examples of that commitment to quality for their innovative engines is the PW-QA 6078 specification.  This 57-page specification painstakingly defines the quality control requirements of P&W suppliers of a wide variety of parts, including but not limited to Castings, Forgings, and Sonic Configuration Parts.  It defines inspection scope, testing methods, quantity requirements, and much more, and is one of the most critical pieces for a supplier when having parts accepted for purchase.
Interpreting and implementing such a complicated document costs both time and money, and takes real expertise to get it right.  It’s updated quarterly, and  its revision list alone is 134 pages long . Furthermore, getting it wrong can easily overwhelm in-house departments with backlogs, costing unnecessary rework and go-backs, and halt revenue collection for supplier firms.  Does your in-house layout department have the expertise necessary?  That’s a risk we don’t think anyone should have to take.
Level 3 Inspection has over 30 combined years of professional experience developing and producing quality inspection layouts falling under the PW 6078 Specification.   Using cutting-edge, validated metrology technology and processes, our seasoned technicians and engineers can collect and analyze data fast, and compile comprehensive, accurate reports ready to go directly to your P&W SQR.  Let us solve all your inspection needs.
Call us today at 772-444-7534 for a no-cost quote, or email us at sales@level3inspection.com.

Want to exceed your part quota and impress your customers?

Here’s How

Drastically increase your daily throughput with Level 3 Inspections’ co-location production inspection service.

With a well-known backlog in the jet engine industry, manufacturers like you are always striving to increase production and meet orders on time. Your customers can’t afford a delayed delivery or a missed monthly quota. Neither can you. You need a way to speed up your throughput and meet your delivery schedules.

Level 3 Inspections has a solution that is proven to work. Check out the results we generated for a leading commercial and military jet engine prime producer:

  • Brought 3D scanning production inspection capabilities and technicians to our client’s location within 36 hours of the request
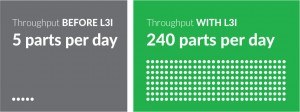
  • Increased our client’s throughput by 790 percent
  • Helped our client not just meet but EXCEED the part quota

Read the full case study and learn why Level 3 was dubbed the “emergency response team” by the manufacturer.
 

READ CASE STUDY >>

Summer blade study promo – exclusively for blade manufacturers


Blade Study Special
Summer promo exclusively for blade manufacturers

If you have a surplus of blade orders and not enough inspection capacity, Level 3 offers some relief. With seven 3D scanners, deep experience with turbine blades and the world’s most advanced inspection process, we can handle all your first article and production inspection needs.

Receive up to 30% off blade study programs, through August 31st.

Our special promo allows you to spend more time enjoying the summer and less time worrying about shipping quotas. Contact us today to learn more and take advantage of this offer.
CONTACT US >>

In the meantime, take a tour of our facility.

Speed Production Inspection with Advanced Metrology Tools

Here’s How


Speed Production Inspection with Advanced Metrology Tools

Increase throughput with 3D metrology tools that speed production inspection beyond what you thought was possible. Level 3 Inspection provides the industry’s most advanced, automated 3D scanning and analysis to help you ship quality parts faster.

Your Production Inspection Partner
                            
Our goal is to step in as your production partner to help you ship parts faster. We recently helped a leading forge operation increase throughput on blade production by 790%, enabling them to exceed client delivery requirements and create a more efficient inspection process. We can help you, too.

Increase your throughput on production inspection and ship parts faster. Contact Level 3 today.

Take the Next Step
                            
 Contact us to speak with one of   our engineers about how we   can optimize your production   inspection process.

CONTACT US TODAY >

Accelerate Your Production Inspection Process

Here’s How

Your Go-to Partner for Production Inspection

When you’re under pressure to ship parts fast, Level 3 Inspection can step in to accelerate your production inspection process.

The Capacity You Need

As the largest provider of 3D inspections for the turbine engine industry, Level 3 has more capacity than anyone else to deliver quick turnaround on your parts and assemblies.
 
7 3D scanners
24/7 operation
1,176 hours per week of inspection machine time


GET A QUOTE >

Ship Us Your Parts – Or We’ll Come to You

Level 3 offers two service delivery options for your convenience:
 

  1. Ship Us Your Parts: Send us your parts – we perform the 3D scans, prepare reports & send back to you.
     
  2. Co-Location: We’ll bring our 3D inspection lab to you to perform scans onsite at your facility.

Request a Quote

Contact us about your project and we’ll give you a quote within the same business day. We can be onsite in as little as 36 hours.

GET A QUOTE TODAY >

Share

Tweet

Share

Forward

Copyright © 2018 Level 3 Inspection, All rights reserved.
You are receiving this email because you opted in to receive our emails.

Our mailing address is:

Level 3 Inspection

1239 SE Indian St Ste 107

Stuart, FL 34997-5633

Add us to your address book

Want to change how you receive these emails?
You can update your preferences or unsubscribe from this list.

Email Marketing Powered by MailChimp

Introducing Onsite Layout Reports from Level 3 Inspection

To view this email as a web page, go here.

Under pressure to get orders fulfilled?
Get layout reports faster – Level 3 Inspection now comes to you

Level 3 Inspection’s new “Co-location” service brings our tools & technicians to your facility for faster dimensional inspection reports on your conforming parts.
 
By having Level 3 perform inspections onsite, you get these benefits:
 
  • Get answers in minutes or hours, not days
  • Can be onsite in as little as 36 hours
  • Eliminate shipping time & costs
  • Advanced metrology tools in 3D scanning and analysis
  • Most experienced team in the business
  • Service-based model allows you to save on capital expenditures
 
We’re available for first article (FAI) or ongoing production parts inspection. Contact us today!

Same Day Quote
 
Tell us about your project and we’ll get you a quote within the same business day. Get a technician onsite in as little as 36 hours.
Get a Quote

About Level 3 Inspection

Level 3 Inspection provides the world’s most advanced dimensional quality inspection capabilities to precision components manufacturers. Using 21st century metrology tools and our proprietary Computer Aided Inspection (CAI) process, we help our clients make better precision parts, much faster, at lower cost, and with greater confidence.
 

Very best regards,
 
Bill Greene
VP Business Development
OPS@level3inspection.com
772.405.7502
Level3Inspection.com

Share

Tweet

Share

Forward

Produce better precision parts, much faster, at lower cost, with greater confidence.
 

This email was sent to: information248.l3v3lthree@blogger.com

This email was sent by:
Level 3 Inspection LLC
1239 SE Indian Street #107 Stuart, FL 34997

We respect your rights – view our policy

Manage Subscriptions | Update Profile | One-Click Unsubscribe

Level 3 Inspection Launches “Co-location” 3D Scanning Inspection Service

Stuart, Florida (March 20, 2018) – Level 3 Inspection (L3I) announced its new “Co-location” service, bringing its 3D scanning inspection laboratory onsite to customer facilities. As the first to offer onsite inspection services for precision components manufacturers, Level 3 expects to dramatically accelerate the dimensional inspection report process and delivery in the aviation supply chain industry.

Test

“Jet engine parts manufacturers are under a tremendous amount of pressure to deliver components quickly,” said Bill Greene, CEO of Level 3 Inspection. “By bringing our 3D scanning lab and technicians to their facilities, manufacturers can now have answers in minutes or hours rather than days.”

Through the Co-location service, L3I technicians and equipment can be onsite anywhere in the U.S. in as little as 36 hours. This eliminates the time and cost it takes for manufacturers to ship parts back and forth for scanning and inspection, speeding the process while saving them money.

The Co-location service provides especially high value to parts manufacturers who have backlogs or are under pressure to fulfill orders in a short amount of time. It also gives manufacturers greater flexibility, allowing them to shift priorities quickly if an emergency or other pressing matter arises.

“A client recently referred to us as their ‘emergency response team,’” added Greene. “Our goal is to help our clients deliver conforming parts faster, to meet their customers’ demands.”

L3I has pilot tested the Co-location program with a handful of customers, all of whom have given positive feedback. L3I has the capability to go onsite for short-term or long-term engagements, providing first article inspection (FAI) or ongoing production parts inspection services. L31 technicians are master practitioners in the modern metrology tools and equipment they bring onsite with each engagement.

As the largest and most experienced 3D inspection services provider, Level 3 Inspection offers the world’s most advanced dimensional quality inspection capabilities to precision components manufacturers. Using 21st-century metrology tools and its proprietary Computer Aided Inspection (CAI) process, L3I helps its clients make better precision parts, much faster, at lower cost, and with greater confidence.

For more information on Level 3 Inspection, visit level3inspection.com


Media Contact:

Bill Greene

(772) 405-7502

sales@level3inspection.com

Need a layout report fast? We’ll do it ASAP.

To view this email as a web page, go here.

Want to know a top secret of precision components manufacturers? Spoiler alert: it’s us. We’ve helped clients save thousands of hours and millions of dollars with our best-in-class layout reports.
 
Complement your in-house teams with our engineering services, including:

Digitizing

  • 3D Scanning (send us parts, or we’ll scan them at your plant)
  • Telemetrology (send us your 3DS scan files for fast analysis/reporting)
  • Smart Surface Prep

Computer Aided Inspection (CAI)

  • Colorplots
  • Dimensional Analysis
  • Problem Solving
  • First Article Inspections (Layouts)
  • Production Inspection
  • Statistical Studies

Quick Turnaround

We understand the pressure you’re under, and that you’re always in a time crunch. We specialize in high-quality, quick-turn inspections so you can meet production goals.

Same Day Quote
 
Tell us about your project and we’ll get you a quote within the same business day, so you can ship your parts to us tomorrow.
Get a Quote
Very best regards,
 
Bill Greene
VP Business Development
OPS@level3inspection.com
772.405.7502
Level3Inspection.com

Share

Tweet

Share

Forward

Produce better precision parts, much faster, at lower cost, with greater confidence.
 

This email was sent to: information248.l3v3lthree@blogger.com

This email was sent by:
Level 3 Inspection LLC
1239 SE Indian Street #107 Stuart, FL 34997

We respect your rights – view our policy

Manage Subscriptions | Update Profile | One-Click Unsubscribe

The 6078 Challenge

The PW 6078 Spec

Pratt & Whitney, as many know, is a world leader in the design, manufacture and service of aircraft engines.  With over 13,000 large commercial engines installed and over 6,500 military engines in service today, Pratt’s innovations in power-plant design continue to set the pace for progress in aviation.  They achieved that rank through intense attention to detail, hard work, and dedication to quality and performance.
One of the best and most rigorous examples of that commitment to quality for their innovative engines is the PW-QA 6078 specification.  This 57-page specification painstakingly defines the quality control requirements of P&W suppliers of a wide variety of parts, including but not limited to Castings, Forgings, and Sonic Configuration Parts.  It defines inspection scope, testing methods, quantity requirements, and much more, and is one of the most critical pieces for a supplier when having parts accepted for purchase.
Interpreting and implementing such a complicated document costs both time and money, and takes real expertise to get it right.  It’s updated quarterly, and its revision list alone is 134 pages long . Furthermore, getting it wrong can easily overwhelm in-house departments with backlogs, costing unnecessary rework and go-backs, and halt revenue collection for supplier firms.  Does your in-house layout department have the expertise necessary?  That’s a risk we don’t think anyone should have to take.
Level 3 Inspection has over 30 combined years of professional experience developing and producing quality inspection layouts falling under the PW 6078 Specification.   Using cutting-edge, validated metrology technology and processes, our seasoned technicians and engineers can collect and analyze data fast, and compile comprehensive, accurate reports ready to go directly to your P&W SQR.  Let us solve all your inspection needs.
Call us today at 772-444-7534 for a no-cost quote, or email us at sales@level3inspection.com.
Call Today

MENU