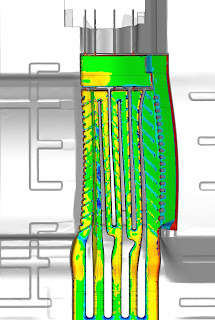
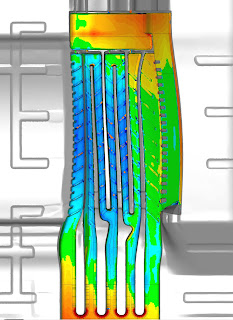
In a product life cycle the largest investment is always the tooling, this is especially true in investment casting. Until now the actual geometry of the Core die has been largely unknown. Level 3 Inspection can use White Light Scanning (WLS) with computer-aided-inspection (CAI) to compare the core die to the CAD model, other core dies and scans of the same die taken over a period of time, to trend wear. This technology gives our customers a new and profound insight into the size shape and geometric conformance of core dies that they have never had before. By inspecting and perfecting the actual core die Level 3 can help their customers quantify shrink rates, identify problem areas in the die and bring better castings to market, faster than ever before.
Level 3 Inspection’s SmartCompare process gives their customers the ability to identify problems with a particular area of the part and focus efforts to improve problem areas without spending time and resources on areas that are known to be conforming. This is especially helpful when dealing with middle step products, such as core dies. The ability to quickly compare the product mold to the nominal CAD model as well as the ability to compare multiple molds and multiple scans of the same mold over time gives Level 3 Inspection’s customers an advantage in regard to quality and time to market.
CMM captures only a few points in the time that WLS can capture hundreds of thousands, so Level 3 is able to do a more thorough inspection. The results are much more visual and therefore much more easily understood and interpreted.
Inspecting injection molded products with complex free form geometry poses some unique challenges, such as analyzing the complex surface areas of a newly manufactured part compared to the CAD model. This is difficult using a CMM system, which depends on the operator to accurately capture the points that will show whether or not the part is conforming within the allowable tolerance. Often, there is not enough point data to make an accurate comparison.
The new capabilities provided by computer-aided inspection have not come a moment too soon for the increasingly competitive injection molding and ceramic core market. Increasingly, companies are facing the demand for more quality inspection results in less time.
Level 3 Inspection’s customers are moving quickly to statistically based inspections in which the qualification is based not on a single piece, but on a sampling of parts, new part inspection would take much longer to complete without the ability to automate portions of the process.
Traditionally, studies based on a sampling of parts are done using CMM to generate metrics on dimensions for each part. This is a time-consuming process, since each part must be measured individually. Data is then typically transferred to an analytic program, evaluated, then published.
Level 3 is replacing the CMM-based process with automated trend analysis. Once a part is scanned and a report is saved, Level 3 can automatically generate portions of the capability studies defined by their customer or OEM specifications. Batch processing enables Level 3 to collect data and generate reports on a large number of parts. Statistical analysis tools allow Level 3 to compare parts for pre-defined factors such as repeatability, changes over time, and variations from part to part.
Speed is the key. Speed of inspection is always Level 3 Inspection’s main challenge. Everyone wants the results yesterday and our process is helping us deliver more complete results much quicker.
Contact us today to start getting superior inspection results in shorter time with easier understanding leading to higher confidence.


